Sunday, June 22, 2008

Misc Recipes

101 Cookbooks

When you own over 100 cookbooks, it is time to stop buying, and start cooking. This site chronicles a cookbook collection, one recipe at a time.

Hearst Castle Shortbread Cookies

By Heidi

This week I'm sharing with you a beautiful, buttery shortbread cookie recipe. I encountered it while on a mini road-trip late last week. Wayne and I packed up the car and headed south down the California coast to our destination,...

Baby Bran Muffins

By Heidi

Today's bran muffin recipe comes from a gem of a cookbook I stumbled upon while browsing vintage books in an antique shop in Cambria, California. We drove through Cambria last week on our Hearst Castle adventure, and it just so...

Potato Croutons

By Heidi

I like a bit of crunch in my soups, and I'm sure I'm not alone. More often than not, the crunch comes in the form of a bready crouton. I was forced to rethink my favorite crouton recipe late one...

Spinach and Zucchini Soup

By Heidi

The zucchini just keeps coming and like many of you, I'm still trying to create delicious and inspired ways to use it up. That being said, I think I've had enough - and with this zucchini soup recipe I'm going...

Coconut Chocolate Pudding

By Heidi

It took me almost thirty dollars in premium chocolate and four lackluster attempts to eventually come up with a chocolate pudding recipe special enough to share with you. I made not only bland, flat, and gelatinous puddings, but also runny...

Vegetarian Lentil Burgers

By Heidi

For those of you who are fans of the chickpea-based veggie burger I did in Super Natural Cooking, you might want to try this vegetarian lentil burger recipe - it's a twist on the one from my book. This version...

Cottage Cheese Muffins

By Heidi

I'm always on the lookout for cookbooks by Rose Elliot. They aren't always easy to find, particularly if you are like me, living in the United States. For those of you who haven't heard of her, Rose is an accomplished...

Porcini Mushroom Fettuccine

By Heidi

This fettuccine recipe was inspired one of the many trips I made to the Testaccio Market while in Rome over the past couple of weeks. As the dollar was creeping toward an all-time low against the Euro, I somehow convinced...

Tapioca Pudding

By Heidi

Ultimate tapioca - a creamy, classic, delicious, vanilla-spiked tapioca pudding recipe.

Bulgur, Celery and Pomegranate Salad

By Heidi

This lovely, jewelled pomegranate salad recipe is from Samuel and Samantha Clark's book Moro East - toasted walnuts, celery, mint, parsley, and garlic. An easy, delicious, and a pretty addition to any table.

Lively Up Yourself Lentil Soup

By Heidi

Healthy, quick, and satisfying this lentil soup recipe delivers layer after layer of flavor. The tang of the tomatoes plays off the earthiness of the lentils, and the fragrant bolt of saffron yogurt brightens each bowl.

Rustic Cabbage Soup

By Heidi


Video: Big Sur Power Bars

By Heidi

A homemade powerbar recipe packed with lots of toasted nuts and coconut, crisped rice and ground espresso beans. Video how-to as well as written instructions.

Poppy Seed Pancakes

By Heidi

My go-to poppy seed pancake recipe. Made with buttermillk, a generous amount of poppy seeds, toasted sunflower seeds. Drizzled with an simple-to-make, chunky citrus syrup.

Chickpea Hot Pot

By Heidi

Not a traditional hotpot recipe, instead...a fast-cooking bulgur cooks in a light orange-juice accented broth. Plenty of chickpeas, tiny cauliflower pieces, onions, and greens add texture and substance to the hearty pot.

Breakfast Polenta

By Heidi

This breakfast polenta recipe is creamy, comforting and receptive to many add-in flavors and textures. For this version I served small bowls of fluffy yellow polenta topped with toasted almonds, jewel-colored dried fruits, and a drizzle of cream and honey.

Garlic Soba Noodles

By Heidi

Garlic soba noodle recipe - a nest of soba noodles, Parmesan, greens, and and garlic powder topped with golden Parmesan-crusted tofu.

Anzac Cookies

By Heidi

An Anzac cookie recipe, with a few little twists. Not overly-sweet, Anzacs are made from oats, coconut, and flour coming together in a butter-kissed dough. You end up with a hearty, sturdy cookie, with little fuss - altogether hard to get wrong.

Lazy Day Peanut Noodle Salad

By Heidi

A peanut noodle salad recipe featuring soba noodles punctuated with spring onions, tofu, peanuts, and asparagus. Serve it up family-style on a platter at a potluck, party, or buffet - it holds up perfectly at room temp.

Sunburst Carrot Salad

By Heidi

A favorite carrot salad recipe - carrot ribbons sauteed in a bit of salt and olive oil and finished off with lemon zest, finely chopped serrano chiles, a quick squeeze of lemon juice, and lots of cilantro.

Cumin-spiked Tofu

By Heidi

Slabs of tofu marinated in a cumin, garlic, yogurt slather and cooked on a grill or in a grill pan or skillet.

Coconut Macaroon Pancakes

By Heidi

A uniquely delicious pancake recipe. If you can imagine coconut macaroons in pancake form - moist, golden, coconut-packed, with just a hint of sweetness - that's what you'll get.

Spring Tabbouleh

By Heidi

A springtime twist on a traditional tabbouleh recipe featuring peas, asparagus, chives and farm-fresh hard-boiled eggs.

Warm and Nutty Cinnamon Quinoa

By Heidi


In a Hurry Green Curry

By Heidi

A quick and delicious green curry recipe - peas, asparagus, and tofu swimming in a fragrant, not-overly-rich Thai green chile broth.

Heavenly Pie

By Heidi


Broccoli Pesto & Fusilli Pasta

By Heidi

A simple pasta bowl made by tossing a whole wheat fusilli pasta, shredded spinach, and with a delicious walnut & brocolli pesto sauce.

Collapse

Chocolate & Zucchini

Daily Adventures in a Parisian Kitchen

Glace Coco du Placard

By clotilde on Ice Ice Baby

Coconut Ice Cream

[Coconut Ice Cream from the Pantry]

The really nice thing when you come back from a vacation, however lovely, is the fresh set of eyes you can lay on your living quarters, and all the things that make them homey and yours.

Your bed, not too firm but not flabby either, and wide enough that two normal-size individuals can stretch their legs without starting a war. Your shower handle, and its nifty flow modes that you can fiddle with to match your shower mood. An oven you can trust, as opposed to an oven that scorches your apple cake the first chance it gets. And, perhaps, a still-very-new-and-still-very-exciting appliance, like, say, an ice cream maker.

I knew I'd have a kitchen to call my own for part of our vacation so I briefly caressed the idea of taking my new toy with me when we left, but even I had to admit the silliness of such a plan. As it turns out, good ice cream was always available in our hour of need, in particular during a few furnace-hot days in Dordogne, when a salon de thé called La Maison de Léo* helped us cool off between canoe rides with numerous helpings of rose ice cream.

Replicating this pale pink gem is high on my back-to-school to-do list, but while I do my homework and figure out the how, the what, and the how much of each, I would like to share the recipe for this coconut ice cream, which I winged and churned when we returned, having wisely left the bowl of my ice cream maker in the freezer, and all the necessary ingredients in the pantry.

Even after you've set aside the ones that call for fresh coconuts**, there is no dearth of coconut ice cream recipes roaming the wild wild internet. I've found recipes that use canned coconut milk, and I've found recipes that steep grated coconut in regular milk or cream before straining it out, but I wanted -- and got -- the best of both worlds: a base of coconut milk, its authority tempered by evaporated milk***, and plenty of toasted flecks of coconut in each mouthful.

~~~

* La Maison de Léo / 14 place d'Armes / 24170 Belvès / map it! / 05 53 28 29 37.

** I've refused to deal with them myself ever since an unfortunate incident involving two members of my immediate family, an innocent coconut, and a fourth floor balcony.

*** The use of evaporated milk in place of cream is a tip shared recently by my mother. The benefit is a lower fat content for a similarly creamy mouthfeel.

[Click through to read more.]

Muhammara

By clotilde on Nibbly Nibbles

Muhammara

[Bell Pepper Caviar with Walnuts and Cashews]

Sometimes, when I have a minute, I sit back and think about the world of food, how vast it is, and how many rivers, hills, and valleys remain uncharted to me: I know so little, and have so much yet to learn. I don't find the prospect overwhelming, far from it. I find it encouraging, I find it promising, I find it comforting: as long as I can read books and move around a kitchen, my life will see no shortage of inspiring ideas, happy discoveries, and exciting projects.

Just this week, I've received two emails from readers offering their recipes and knowledge, should I want to explore their home countries' cuisines (Argentinian and Turkish, no less), and a review copy of the most inspiring book I've seen in a while, Moro East, in which practically every page now wears a sticky tag on its lapel.

Another example is this muhammara. I don't remember how the concept fell into my lap -- did I read about it on a website? in a book? -- but this Middle-Eastern spread, made from roasted bell peppers and walnuts, appealed to me instantly. It was novel to me, I had never tasted it anywhere, but my mind's taste buds could barely contain their enthusiasm.

Part of the attraction was the fact that muhammara is best made with pomegranate molasses, a popular ingredient in Lebanese and other Mediterranean cuisines that has become rather trendy of late*. Here, this sweet and acidic syrup is called for to bridge the sweetness of the peppers and the bitter edge of the walnuts.

I, like most suggestible cooks who read magazines, have acquired my very own bottle of pomegranate molasses from Heratchian Frères a few months ago, but a little goes a long way, and I'm always looking for different productions to cast them in. This muhammara is, so far, the unchallenged winner, and I have officially named it my new favorite for a make-ahead apéro spread.

The recipe below is the product of my usual recipe research method (gather-combine-tweak-shake-shake-shake), and the fact that I got confused about the amount of nuts to peppers. This forced me first to use cashews in addition to my too short supply of walnuts (this worked so well I will do the same in the future) and then to roast two additional bell peppers** when I realized my spread was too nutty (yes, there is such a thing; it came as a surprise to me, too).

As a consequence, my first batch yielded way more muhammara than I needed for that one dinner party, but I froze the leftovers in two little tubs that I whipped back out on two subsequent occasions, with no loss of flavor and to just as much acclaim, so I wholeheartedly recommend that modus operandi. One sleeps so much more soundly with an emergency dose of muhammara in the freezer.

The most typical way of serving muhammara is with pitas or lavash, but it is just as good on sliced baguette, and it is an absolute delight plopped onto thickish slices of cucumber.

* Pomegranate molasses, sometimes called pomegranate syrup (mélasse de grenade or mélasse de pomme de grenade in French), can be found in Middle-Eastern stores (get some zaatar while you're at it). In France, it is most often imported from Lebanon. If you can't find it, The Cook's Thesaurus suggests various substitutions; for this recipe, balsamic vinegar seems the most appropriate.

** On the subject of bell peppers, I'd like to share my latest epiphany. You know how slimy roasted bell peppers are, and how annoying it is to remove the little seeds once they're embedded in the slime? Well, what I do now is deseed the peppers before roasting -- I know, how revolutionary. While the peppers are still raw, I carve all around the stem, pull it out, and discard the seeds that come with it. Then I hold the peppers upside down, and slap them a few times on the sides so the remaining seeds fall out (plus, the sound is fun). The bell peppers, thus decapitated and gutted, are then submitted to my regular roasting procedure in the oven.

[Click through to read more.]

Crumiri

By clotilde on On A Sugar High

Crumiri

[Italian Cornmeal Cookies]

We all have our siren ingredients, those that call to us in voices of sugar from the printed page of a cookbook -- or the pixelated page of a food blog -- and charm us into dropping whatever we're doing to run to the kitchen and reenact the recipe.

Cornmeal is one of my sirens, and I find it particularly beguiling in baked goods*. This is the only way I can explain such a short TTO (time to oven) for this cookie recipe, which I chanced upon last week on Ivonne's fine blog, Cream Puffs in Venice.

Crumiri, sometimes spelled krumiri, are traditional Italian cookies that hail from the Piedmont region. The origin of the name is hazy: crumiro means strikebreaker, so that can't be it, and while some say the cookies were named after a Tunisian liqueur called Krumiro (or Krumiria, presumably like the Maghreb region) that the baker-inventor liked to swill, the Internet knows nothing about this mysterious beverage. No matter.

These cookies can take on different shapes, but they generally wear a ridged outfit, created by the star-shaped tip of a piping bag. Alas, I am a poorly equipped baker and my flimsy piping bag did not resist the assault of such a thick dough**. After a brief but irritating struggle, I resigned myself to forming vague lumps.

Aside from this minor hurdle, these are precisely my kind of cookie: crumbly, with the teasing crunch of cornmeal between your teeth, delicately flavored, and not too sweet. And in keeping with the regional theme, I have found them to be ideal companions to a scoop of homemade Nutella ice cream***.

The recipe Ivonne posted comes from a book called Italian Baking Secrets, written by an Italian priest; I modified it to reduce the amount of butter and sugar slightly. If you want to make ridged ones, make sure you use a professional-grade piping bag and tip that won't burst and poop out on you. I'm just saying.

* If you share my cornmeal enthusiasm, consider trying my go-to recipe for shortbread, or these violet cornmeal macarons.

** It has to be thick, otherwise the ridges will just soften and melt away in the oven.

*** Yes: before it became a world-renowned addictive substance full of transfats, Nutella was a piedmontese specialty known as pasta gianduja.

[Click through to read more.]

Super Simple Nutella Ice Cream

By clotilde on Ice Cream

Nutella Ice Cream

My sister's husband has a passion for Nutella. When Ferrero put out a 40th-anniversary Nutella jar* of woolly mammoth** proportions, Christian bought one and actually spooned his way through it. Not in one sitting, admittedly, but still.

I love my brother-in-law dearly, so when he and my sister came to dinner a few weeks ago, I thought I'd treat them to Nutella ice cream for dessert. I considered going the classic ice cream route, starting with a custard base to which I'd add Nutella, but I was feeling under the weather and this was more work than I wanted to tackle.

Instead, I used a much easier, much more straightforward formula: equal weights of Nutella and unsweetened evaporated milk (lait concentré non sucré), combined and churned into the creamiest, most indulgent concoction ever to emerge from my ice cream machine.

This first attempt was wildly successful (and I do mean "I would marry you if I hadn't already married your sister" successful) yet two problems remained: 1- although the French version of Nutella contains no transfats, it still leaves much to be desired on the nutritional front, and 2- the one-to-one ratio resulted in an ice cream that was, in my opinion, sweeter than strictly necessary.

It took little brainjuice to figure out a solution: replace the Nutella with an all-natural, organic equivalent, and use less of it.

My organic store stocks several brands and variaties of chocolate hazelnut spread, involving different proportions of hazelnuts and chocolate. After studying the labels for a while, I set my heart on Jean Hervé's Chocolade, for three reasons: I'm already addicted to his stone-ground nut butters, a portion of the company's sales is donated to a charity that builds schools in Madagascar, and the guy has a ponytail.

As the obligatory spoon test revealed***, this Not-ella is less sweet than its world-renowned cousin, and less eerily smooth, too. It would be unfair to describe the texture as grainy -- it is not -- but the tongue senses and aknowledges that real hazelnuts have given their lives for the cause.

And I'm happy to report that, when enrolled in this ice cream project of mine, La Chocolade performed to the complete satisfaction of all who had a chance to taste it before the tub mysteriously emptied. The ice cream was most often paired with the best sablés in the galaxy (I'm serious): Poilâne's punition cookies, which now come in an adorable spoon shape to serve with coffee, or, for a limited time only and until the Saint-Valentin crap finally boils over, in a heart shape.

~~~

* I believe this collector's item weighed in at 5 kilos (~11 pounds).
** Did you know woolly mammoths had a flap of hairy skin over their anus to keep out the cold? Can you think of a more endearing feature? or a more appropriate topic to discuss with your V-Day date?
*** The spoon test should be conducted as follows: take spoonful, place on tongue, close mouth, draw spoon out, close eyes, swish, chew, swallow.

[Click through to read more.]

Carottes et Betteraves Râpées

By clotilde on Vegetables

Carottes et Betteraves Râpées

[Grated Carrots and Beets]

I used to think winter produce was drab, and that the cook's only option was to wait the cold months out, squinting into the distance, longing for asparagus and strawberries to appear ("Anne, Sister Anne, do you see nothing coming?").

Now I can't imagine how I could ever be so blind: what of mâche and winter squash, what of flower cabbage and broccoli, what of endives and leeks and chard, what of carrots and beets? Do they count for nothing?

Perhaps it has helped that the Paris winter has been so mild (again) this year and that -- in my memory, at least -- the sun always seemed to be out on Saturday mornings, as I vélibed to and from the greenmarket.

Whatever the reason, this is the first year I registered a distinct pining when my habitual provider confessed he would have no more winter pears for me (it's been such a good season for pears!) and when I saw, a few stalls down, the first crop of fresh peas.

"Oh, no!" I sobbed in my turquoise scarf, "this is too soon! I'm not ready to let go of winter just yet!" And then I thought, "I must write about the grated carrot and beet thing before everyone moves on to greener pastures."

So there you have it: my favorite go-to lunch of the Winter 2007/08 collection, the salad I've made and relished on a weekly basis over the past few months, so much so that an estimated 27% of my body mass is now made up of grated carrots and beets.

This salad is based on a simple deduction: grated carrots rule and, although that is a much more hush-hush fact, so do grated beetroots. Ergo, the combination of the two is a civil union made in heaven.

Plus, I'm lazy, and crudivorism is the path of least resistance from basket to mouth.

If you've never tasted the root of a beet in its raw state, I urge you to give it a try, whether or not you (think you) despise cooked beets, for the two provide very different taste experiences.

Granted, the addition of grated beets to a grated carrot salad does not cause any sort of quantum shift, but it does add a deeper note to the chord, sweet yet throaty, and it colors the whole thing with the beetroot's infectious purple enthusiasm.

I've written this salad into a recipe below, because that's what food bloggers do, but the truth is I never make it twice the same way.

It always begins with (approximately) the same weight of carrots and beets that I peel, grate, and toss with a bit of oil and vinegar, but I then switch to improv mode: I just pluck from the rows of bottles and jars that crowd my kitchen counter, and I pour, dash, sprinkle, and pinch as my mood commands. I suggest you do the same.


Continue reading "Carottes et Betteraves Râpées"
View comments

Copyright Clotilde Dusoulier © 2003-2008. This feed is for personal enjoyment only, and not for republication.
If you are not reading this in a news aggregator, the site you are viewing is guilty of copyright infringement. Please alert Clotilde Dusoulier.


Squeeze Cookies (A Roasted Flour Experiment)

By clotilde on Desserts & Sweets

Squeeze Cookies

Among the many things I learned during that memorable conference on molecular gastronomy, one idea has been whirling around my brain with particular insistence since then, and it is that of farine torréfiée*, or roasted flour.

It was introduced to us by way of a truism: raw flour is bland, browned flour isn't. This is why we bother to make roux, and why the crust of bread is tastier than the crumb. With this simple fact in mind, why not bake with roasted flour? The finished product would no doubt benefit from the heightened flavor.

Of course, exposing flour to direct heat cooks it. This changes the structure of its starch and gluten molecules, and thus it behaves differently from raw flour; one notable change is that it loses some of its elasticity. Consequently, the primary use Hervé This suggested for roasted flour is in sablés, i.e. cookies with a crumbly, sandy consistency, for which a weak gluten network is desirable.

I found a recipe for sablés à la farine torréfiée on Pierre Gagnaire's website** and it looked exciting (it uses cooked egg yolks! exciting!) but for my first roasted flour experiment, I was more curious to alter my -- or, should I say, my mother's -- basic recipe for sablés.

I did follow Gagnaire's instructions to roast the flour, and after just a few minutes I could tell that this was going very well: already my kitchen smelled like the bakery around the corner***. When the flour had cooled and I used it to make the sablé dough, however, I realized it would not come together as obligingly as it normally does, but seemed rather to wish to remain a mound of sand.

I sensed that adding more butter would do the trick, but I like the moderate butter content of my mother's recipe (most call for equal weights of butter and flour) so I proceeded as planned, and tried to form the dough into lumps however I could. The easiest (and most fun) way was to just squeeze it by the handful, a technique that resulted in these odd-shaped cookies I naturally decided to call squeeze cookies.

I find their funky look endearing, but if you're worried that someone in your household (and I'm not naming names) might liken them to slugs or caterpillars, you can also shape them into balls, or pucks, or pack the dough in an even layer in a pan, following the instructions in this shortbread recipe.

More important than the shape, you'll agree, is the flavor: I deliberately omitted any sort of flavor booster (vanilla, spices, citrus zest...) the better to judge the effect of the roasted flour, and I'm not afraid to say the effect is absolutely wowing. In fact, the same person who was so full of gastropod metaphors declared them the best sablés I'd ever made.

Grilled notes of chocolate and hazelnut come through in every bite, the consistency is a fine crumbliness unlike that of any sablé I know, and all that comes from a simple twenty-minute roasting step. See how the baking horizon has suddenly broadened? Don't you have a favorite baking recipe you should be experimenting with, right this minute?

~~~

* The French term torréfier (to torrefy) has a slightly different meaning from rôtir (to roast) but has, to my knowledge, no exact equivalent in English. Torréfier is defined as "exposing to intense heat until the early stage of carbonization." The most frequent use of the term -- and the process -- is the roasting of green, raw coffee beans, which turns them into a browned, intensely fragrant version of themselves.

** Pierre Gagnaire and Hervé This engage in a monthly conversation (in French, of course) wherein the scientist explores a chemical or physical phenomenon and the chef offers a recipe to illustrate it.

*** They say you should bake a loaf of bread before people come to visit the house you're trying to sell, but, as it turns out, just roasting some flour should do the trick.


Continue reading "Squeeze Cookies (A Roasted Flour Experiment)"
View comments

Copyright Clotilde Dusoulier © 2003-2008. This feed is for personal enjoyment only, and not for republication.
If you are not reading this in a news aggregator, the site you are viewing is guilty of copyright infringement. Please alert Clotilde Dusoulier.


Collapse

Cooking For Engineers

Have an analytical mind? Like to cook? This is the site to read!

Recipe File: Ratatouille

By Michael Chu

With Ratatouille (a new animated movie from Pixar) coming out in a couple weeks, I thought it would be fitting for me to present a recipe for Ratatouille (a dish from Provence). This is a wonderfully flavorful vegetable dish that can be served as either a side or as a main entree.


Ratatouille (serves 4 to 6)

Dining Out: Chad's Fish & Chips (Willits, California)

By Michael Chu

Tina and I have been wanting to recommend a particular restaurant to our friends for the last five years. The problem was we couldn't remember what town it was in or what it was called. All we knew was that it had the best fish and chips we had ever had, and it was somewhere in Northern California. This weekend we finally found it - it's Chad's Fish & Chips in Willits, California.


Collapse

Grilled Cheese, Pear & Smoked Turkey Sandwich: Recipe

By Amy Sherman

grilled cheese sandwich turkey and pear
Recently I've been having some fun in the kitchen creating recipes using products from Dulcet Cuisine including my favorite, the Madras Curry Mustard. I'm not the only one to have fallen in love with it, it was chosen the grand champion at the 2006 Napa Valley Mustard Festival Worldwide Mustard Competition. It's a mildly spicy mustard that really perks up all kinds of dishes.

Whenever I'm in Hayes Valley around lunchtime, I'm always tempted to stop by Arlequin for a toasted cheddar, pear and bacon sandwich. The bread is crispy and crunchy, the cheese oozes and the sweetness of the pear is offset by the smoky saltiness of the bacon. Taking that sandwich as inspiration I decided to add mustard to my version. I was sure the warm spices including cinnamon, clove and cayenne in the mustard would really be delicious with the pear but I didn't want the intensity of bacon for this sandwich. After experimenting a bit, the combination I settled on was smoked turkey, white cheddar and pear. Smoked turkey is a good sandwich choice, it adds some heft and lean protein, and is healthier than ham or bacon.

One trick to getting this sandwich is right is to layer the ingredients just so. Start with a mustard slathered slice of bread and top it with cheese. The cheese and the mustard will kind of melt together. Put the smoked turkey in the middle and on the top put the pear. By grilling or toasting the sandwich on both sides in a pan you get a warmed through pear and gooey cheese that holds the turkey firmly in the middle. Make sure the cheese has melted before taking it off the heat. The last key is to let the sandwich sit for a few minutes before slicing, if you can!

Grilled Cheese, Pear and Smoked Turkey Sandwich
serves 1

2 slices of sandwich bread, white or wheat
Madras Curry mustard
One half a ripe pear, thinly sliced (enough to cover the bread)
2-3 thin slices white cheddar cheese
2 very thin slices smoked turkey

Butter the bread on one side of each slice, and spread mustard on one slice. Layer cheese, turkey and one layer of pear on top of the mustard spread side of bread and top with another slice. Buttered sides of the bread should be facing out. Toast in a frying pan, sandwich press or non-stick grill. If toasting in a pan, place something on top of the sandwich to weigh it down such as baking sheet or a heavy frying pan. Cook until golden brown and cheese melts. Let cool slightly before cutting in half and serving.

Enjoy!

Crispy Panko Mustard Chicken: Recipe

By Amy Sherman

Crispy Panko Mustard Chicken
Do you know panko? It's a Japanese style of bread crumbs used to coat fried food. The crumbs are large and very flaky. It's made from yeast-raised bread dough that is baked in a special oven so it does not form a crust. The crumbs start out very pale colored but cook up golden brown. You can find it in the Asian section of just about any supermarket.

Traditional Japanese recipes using panko include Tonkatsu, a breaded fried pork cutlet. It is delicious, like most fried food, but not very healthy. I knew there had to be a way to use panko to make an oven-fried crispy chicken breast or cutlet. But I will admit, it took several attempts to get this one right. It really satisfies that craving for crispy fried food but is practically guilt-free. I used the Creole Mustard from Dulcet Cuisine which has a stone-ground texture and is flavored with onion, garlic, paprika, pepper and thyme. So I guess this is kind of a Southern/Japanese fusion entree.

The trick to this technique is to mix the panko crumbs with just a little bit of melted butter then put it on top of the mustard coated chicken by hand instead of dipping the chicken in the crumbs. You can use any kind of mustard you like, but the Creole Mustard is really terrific with this recipe. I recommend letting the chicken cool a little and serving it in slices with roast potatoes, carrots and brussels sprouts.

Crispy Panko Mustard Chicken
serves 2

1 Tablespoon unsalted butter
1 Tablespoon Creole Mustard
1/4 cup panko
2 skinless, boneless chicken breasts

Preheat oven to 475 degrees. Melt the butter in a small dish in a microwave oven then combine the butter with the panko crumbs in a small mixing bowl.

Coat chicken breasts with mustard then place on a greased, foil-lined baking sheet, top with crumbs and bake approximately 15 minutes or until cooked through and golden brown.

Enjoy!

Marinated Mustard Vegetables: Recipe

By Amy Sherman

Marinated Mustard Vegetables
I don't think you can ever have enough vegetable recipes. Growing up I ate vegetables steamed and served plain. Frankly I found them pretty boring served that way and I still do. Vegetables should be savored. Of course drenching them in hollandaise sauce or butter makes them taste good, but that's not the only way to dress them up. I like sauteing vegetables with a little red chili, garlic, sprinkling them with fresh herbs, Indian spices, drizzling on any numbers of flavorings.

So often the recipes I develop for clients are very meat-oriented. I like challenging myself to come up with interesting vegetable dishes when I can. This marinated vegetable salad was developed because I wanted to find something that would be good for a potluck, It uses a variety of vegetables and can be served cold or at room temperature, but won't wilt like a green salad.

Unlike some dishes that I have to repeat several times to get right, this one was a surprise because it came out great the first time I tried it. I like experimenting with mustard as a seasoning for vegetables. We usually think of it as something to serve on hot dogs but it is so much more versatile than that. The Moroccan mustard from Dulcet Cuisine has pungent flavors of ginger, coriander, garlic and paprka in it. Just a mere tablespoon flavors a big batch of vegetables beautifully. You could easily vary the vegetables to taste. It keeps very well in the refrigerator.

Marinated Mustard Vegetables

2 cups small broccoli florets
1 cup cherry tomatoes
2 cups button mushrooms, cut into chunks
1 cup zucchini, cut into chunks
1/3 cup apple cider vinegar
1 tablespoon Moroccan mustard
1 tablespoon olive oil

Combine vegetables in a large zip lock bag; set aside. Combine vinegar, mustard and olive oil in a jar; cover tightly, and shake vigorously. Pour over vegetables, and toss the bag gently to coat them completely. The mixture will seem a bit dry, but the vegetables will become more juicy as they marinate. Marinate in refrigerator 8 hours or overnight, turning the bag occasionally. Serve cold or at room temperature.

Enjoy!

Mustard Roasted Potatoes: Recipe

By Amy Sherman

Mustard roasted potatoes
In addition to being an absolute pasta freak, I am passionate about potatoes. I could eat pasta everyday and potatoes, probably every other day. I love them every which way. A number of years ago Oprah's personal chef at the time wrote a cookbook called In the Kitchen with Rosie. It was a huge bestseller and featured very low fat recipes. There were some good recipes and techniques in the book. One of the recipes that made a big impression on me was called Mustard Roasted Potatoes.

The Mustard Roasted Potato recipe was red potatoes tossed with Dijon mustard, cumin, paprika, chili and cayenne. The potatoes roast in the oven and become all crusty and delectable. It's a great technique and can be endlessly varied. I've incorporated plain yogurt, fresh herbs, and different kinds of mustard. I like the Moroccan mustard from Dulcet Cuisine for this recipe because it has so much flavor you don't need to add any additional spices, but feel free to experiment and try any spiced mustard you like or add some spices.

Seriously, these potatoes are like candy they are so good! They are as addictive as french fries but infinitely healthier. Serve them as a side dish but make extras because they reheat fabulously well and even make a great snack. This is also about the least fussy recipe ever, you really can't go wrong with it.

Mustard Roasted Potatoes
Serves 4

1/3 cup Moroccan mustard
2-3 Tablespoons olive oil
1 1/2 pounds red potatoes, cut into small thumb-sized chunks

Preheat the oven to 400 degrees. In a large mixing bowl, whisk together the mustard and olive oil. Add the potatoes and toss to coat. Dump the potatoes onto a foil lined large rimmed baking sheet and spread them in a single layer. Roast, tossing with a spatula a few times, until the potatoes are crusty on the outside and tender throughout, about an hour. Serve hot.

Enjoy!

Collapse

scott hutcheson

Food. Family. Community.

  • Collapse
  • Updated: Sat, Jun 21 2008 12:29 PM

Pumpkin Flatbread

By Scott Hutcheson

Originally published in melt-in-your-mouth newspapers on October 11, 2007

With the holiday season just around the corner, many of us will have homes filled with family and friends - parties, open houses, and social visits occupying much of our calendars during the cooler months. We start this season with Halloween parties and Thanksgiving gatherings and nearly every weekend in December can be filled with holiday parties and we conclude the season with New Years festivities and Super Bowl shindigs.

With all that entertaining, many of us find ourselves cooking more and looking for foods that can hold up in buffet lines and have staying power during those come-and-go open houses. We all have our go-to favorites like the crock pot full of meatballs, the cheese log, and the vegetable tray.

Low-maintenance dishes are a must, unless you want an excuse to stay in the kitchen and away from Uncle Ned. There are lots of good fix-it-and-forget-it choices and I’ve got a new one in my repertoire for this holiday season - Pumpkin Flatbread with Caramelized Onions, Gorgonzola, and Crispy Sage. I realize this is one of those pretentious recipe titles that sounds more like a grocery list than an actual food, but I can’t come up with a better name.

Regardless of what you want to call it, this is good stuff. The caramelized onions carry plenty of sweetness and the gorgonzola adds a distinctive earthiness. The crispy sage helps bring it all together.

This is great for a buffet or open house because it is a good at room temperature as it is right out of the hot oven. Cut it into small pieces and put it on a platter and you forget about it completely. When in non-party mode, pair it with a nice-sized salad for a surprisingly hearty meal.

Pumpkin Flatbread with Caramelized Onions, Gorgonzola, and Crispy Sage

Flatbread

  • 3/4 cup warm water (about 115 degrees)
  • 1 envelope active dry yeast
  • 2-1/4 cups all-purpose flour
  • 1 teaspoon sugar
  • 1 teaspoon salt
  • 1/3 cup canned pumpkin
  • 3 tablespoons olive oil

Toppings

  • 4 large onions, peeled and sliced thin
  • 1 tablespoon olive oil
  • Salt and Pepper
  • 8 ounces gorgonzola cheese, crumbled
  • 24 fresh sage leaves, washed

Fill a small bowl with the 3/4 cup warm water and stir in the yeast. Let this stand for about five minutes or until the yeast dissolves. Mix the two flours, salt, and sugar in a food processor, pulsing a few times to combine. Add the water and yeast, along with the olive oil and processes until it forms into a ball.

Move this to a floured work surface and knead until smooth, adding more all purpose flour, if needed, until the dough is smooth and not sticky. Transfer the dough to a lightly oiled bowl, cover with plastic wrap and place in a warm dry place to rise until doubled in volume, about an hour.

Punch down and the dough is ready to use immediately or placed in a plastic zipper bag (quart-size is perfect) and stored in the refrigerator overnight.

When ready to make the flatbread preheat oven to 475 degrees. Heat a large skillet to medium heat and add the olive oil. Saute the onions, adding salt and pepper to taste, until caramelized. About 10 minutes.

Remove the dough from the fridge, if refrigerated, to get the chill off (handles better when not too cold) and divide the dough in half for two flatbreads. Use a floured surface, a rolling, pin, and your hands to get the flatbread very thin. Work on getting it into a 13-1/2 by 8-1/2 rectangle. Do this with both portions of dough. Transfer to baking sheets lined with parchment paper. Top each flatbread with half the onions and gorgonzola. Place in oven for 10 minutes. Remove, top with sage leaves, return to oven for an additional five minutes. Cut into pieces about 3” by 3.” As an appetizer, two flatbreads will serve about 12.

Collapse

Slice

Slice

America's Favorite Pizza Weblog. "Crusty, Saucy, Cheesy since 2003."

Stay in School, Kids

In pizza weirdness

Because math really does come in handy. From a guy who knows pies and pi, simple geometry reveals that two 8-inch pizzas are not equivalent to one 12-incher:

... the waitress came by with an 8-inch round pizza, explaining that another waitress had mistakenly given our pizza to someone else. She said we could have this 8-inch pizza now, and she’d have the cook throw another 8-inch pizza in the oven for us. She claimed that we’d be getting more total pieces of pizza, so this was a good deal for us.

After doing some quick mental math (area of a circle = pi*radius². Two 8-inch pizzas = 2*pi*(4)² = 32*pi square inches, One 12-inch pizza = pi*(6)² = 36*pi square inches), I told her we’d be missing out on over 12 square inches of pizza, so we’d rather just have the one 12-inch pizza. She complied, and as a nice bonus (probably because she was impressed by my quick geometry skills), she let us have the extra 8-inch pizza anyway. Score one for geometry!

Kansas City Backyard Pizza Oven

20070913dansoven.jpg

20070912danzpizzazovenz02.jpgA good friend of mine, Andy G., who lives in Kansas City and who I've known since college days, emailed me last Friday: "I'm going to my friend Dan's place for pizza tomorrow. He built his own backyard oven."

So earlier this week, Andy emails me a link to some photos of Dan's oven, along with this info:

It was amazing. Some of the best pizza I have ever had. He used a good dough recipe and made a great sauce from scratch. But the oven:

He used EIGHT different types of brick.

It took him over SEVEN months to build.

I was surprised by how fast the pizzas cooked. About three minutes per pie. Of course, they were all small. He made about twenty by my estimates. Each was different.

He used the plans from some restaurant in Australia.

It is unbelievable.

I'll see if I can contact Dan and get some more details on his amazing-looking oven. It's really beautiful.

Man Builds Coal-Oven Grill Simulator

In Not For SE Index

Editor's note: A short time ago, homeslice Philip G. got in touch, telling me there was a post on pizzamaking.com that was making quite a stir: Reverse-Engineered Coal-Fired Brick Oven. Apparently, a Michigan man had invented a grill insert that he claimed simulated a coal- or wood-fired oven. I clicked over and became fascinated by the metal-and-stone device (pictured below). Could something so simple-looking achieve the holy grail of at-home pizza-making—hot enough and consistent enough temperatures to perfectly cook a pie? I don't know yet, because my 2stone Pizza Grill has only today begun its UPS journey to my home in Brooklyn. Anyway, Philip has been in on the 2stone discussion thread on pizzamaking.com since the beginning, so he offered to do a Q &A with the inventor, Willard Gustavsen. Here 'tis. Many thanks to Philip! —Adam

200710092stoneinsert.jpg

Name: Willard Gustavsen
Location: Southwest Michigan
Occupation: Designer, manufacturer, builder
URL: 2stonepizzagrill.com

Tell us a little bit about where this project came from—where did you initially get the idea to make a pizza-oven insert for grills?

Most of the design work I have done has been related to specialty tools for the building industry. I have either sold the patent rights or have manufactured products and private-labeled them for companies. I have always liked good pizza and thought it would be a fun project; to see if I could design a simple oven or tool that could duplicate the results of an authentic wood-fired hearth oven. Essentially the 2stone Pizza Grill is just another tool of sorts.

At first, all of my prototypes were wood-burning and were a combination of steel and fire bricks. I tried many different styles, mostly looking for a way to reduce the number of bricks it took and also trying to find ways to shorten the fire-up time. Since I genuinely like pizza and pizza-making, it was more interesting than some of the other projects I've worked on. I kind of had my doubts about making something saleable, because it could be really expensive to ship a lot of bricks around the country.

I guess that's where I started thinking about a grill insert. I already had a grill "the heat source" and I figured most people do, so why bother reinventing "the heat part"? I also got tired of having to burn all that slab wood just for two pizzas.

How long has it taken to get all the kinks out of the system, from start to finish?

I started 5 or 6 years ago. I didn't work on it all the time but kept thinking about it in the back of my mind. I would scrap the last prototype and build a new one, always looking for a way to do more with less—fewer firebricks and shorter fire-up times, for example. Once the final concept was down, it did boil down to ironing out the kinks, as you say.

Angela's: A Coal-Oven Pizzeria in Massachusetts

In Not For SE Index

Dear Slice, Letters From Our Readers

I am a devoted slice eater and pizza worshiper from Providence, Rhode Island. I am writing to you from the state of Esprito Santo in Brazil.

Before I left for my trip, I had the pleasure of dining at Angela's Coal Fired Pizza in Saugus, Massachusetts (actually, immediately before leaving from JFK, I stopped at L&B Spumoni Gardens, Nathan's, and Di Fara within a two-hour period). Angela's opened in November, I believe. As far as I know, it's the closest coal oven to my Providence home. It may be the only one in Massachusetts as well.

Collapse

Too Many Chefs

Spoiling the Broth since February, 2004.

Warm zucchini salad for a hot summer day

By Meg in Paris on Recipes - Salads

zukesalad.jpg

Did anyone grow up liking zucchini? Raise your hands. I don't think I see many out there. Zucchini is so easy to grow, so prolific and - in the hands of a 1970s working mother - so big, woody and boring. My mother and grandmother did their best to disguise the fact that we had too many zucchini by baking them in sweet zucchini bread or burying them in zucchini lasagna. But nothing could disguise the fact that, on their own, they were the most boring vegetable in the world. Or so I always thought.

Then I moved to Europe. I discovered this wonderful vegetable called a "courgette", that had a vague resemblance to a zucchini. It was the zucchini's younger, more elegant and refined cousin. And I fell in love. I have long loved grilling zucchini and eggplant and layering them in a salad with sweet grilled peppers. I love to include them in my non-authentic stir fries. I have even experimented successfully with turning them into mini-cheese tarts. But I think this new simple salad might be my favourite use for tender young zucchini. I will warn you: it's not low calorie. Oh yes, you saw the word "salad" and thought it would be a nice healthy side dish. Well, it will help you towards your 5-a-day goal for vegetables but it will also probably take you to the maximum limit on fat. But it's so worth it. Buttery, nutty, silky zucchini set off perfectly by sharp sweet tomatoes, with a side note of lemony basil. Even the Critic - who is no fan of the courgette - had a healthy (ahem) portion.

One of the things that surprised me most when I came to assemble this salad is how well the combination of butter in the cooking and olive oil in the dressing worked. Don't ask me why: I just take a leap of faith sometimes and it works. Don't skimp on the salt, either, as it will liven the flavours, always important when you have very simple ingredients.

Warm zucchini salad (serves two)

2 small zucchini (courgettes)
4-6 small very ripe cherry tomatoes
2-4 Tbs sweet butter
1-2 Tbs peppery olive oil
pinch of salt
good grinding of pepper
a small handful of fresh basil leaves, finely chopped.

Melt the butter until it froths in a nonstick frying pan and add the zucchini, sliced in rounds about 1/2 to 3/4 cm thick. You will probably need to cook them in a few lots, as you want them to be in a single layer. After a few minutes, turn over the slices. They should be just starting to brown. Remove when they are tender but not cooked to the point of falling apart and drain on a paper towel. While you are cooking, you may notice the butter has browned a bit - this is fine and adds a nutty flavour, but don't let the butter burn. You may need to add a bit more butter as you finish cooking the last of the zucchini. To assemble the salad, spread the zucchini out on a platter and sprinkle with cherry tomato slices and basil. Drizzle the olive oil over the salad and lastly sprinkle with a bit of salt and pepper. You can prepare this before you make the rest of dinner and just set it aside. For this reason, it's perfect for a dinner party as you can prepare it completely in advance. Just don't forget to serve it (as I tend to do whenever I prepare something well in advance of a dinner party, sigh).


comments

Bang-Bang! Chicken!

By Meg in Paris

bangbang.jpgAs mentioned in the previous post, I've been on the look out for easy recipes that will appeal to both children and adults lately. This one has not been tested on the toddler yet for the simple reason that so far he is resistant to the lure of peanut butter. I'm pretty sure that - like his chocolate aversion, which disappeared recently - it will go away in time and he'll gobble PBJs like any other red-blooded (half) American child. In addition, I just thought the version I saw Tana Ramsey preparing on TV looked healthy and reasonably flavourful. I bought some peanut butter and, as one does, started browsing the web for recipes.

The first thing I noticed is that this is a popular dish in the UK. The second thing I noticed is that the only site dedicated to Chinese food that had a recipe called for sesame paste, not peanut butter. But by now I was committed (I'd bought the darn stuff after all) and anyway I had a taste for peanut butter. It happens sometimes. If I had some saltine crackers I know I could finish the jar in a sitting. But I digress.

So I had the chicken, the peanut butter and a variety of recipes. I took the things I liked best from each of the recipes, add a few touches of my own and came up with a really delicious dinner. The Critic praised the flavours and the healthiness factors but thought the sauce was a bit thick. I noticed in the TV version I saw that the same was true, and so I suspect this may be just the way it's supposed to be. Anyway, that's what I told him. We both were surprised how much we enjoyed the salad part of the dish as neither of us is a fan of grated carrot. Soaking it in rice vinegar seemed to take away the woody dry aspect that carrot salads so often have.

Bang Bang Chicken (serves 4)

After discussing the thick sauce issue with the Critic, I toyed with the idea of making this for Barrett and the Redhead, using spring roll wrappers to bring it all together in a neater package. As they are not meat eaters, I planned on using tofu in theirs. But alas it appears that the Redhead is no fan of cucumber and I think its light flavour and watery crunch are essential to the dish. So that experiment will have to wait. It's still delicious as described below.

4 chicken breasts
2 cups chicken stock (from cubes or paste is fine as it's just for poaching)
lump of ginger about the size of a thumb

1 cucumber
2-3 carrots
6-8 spring onions
2 Tbs rice wine vinegar

4 handfuls of soft buttery lettuce

2 heaping tablespoons of peanut butter
1 Tbs sesame oil
1 Tbs (or to taste) hot pepper oil
1 Tbs vegetable oil (in my case, sunflower)

Garnish: 4-6 tsp sesame seeds

Bring the stock to a light boil. In the meantime, peel the garlic, cut it in a few big chunks, smash them with a mallet and add them to the broth. Add the chicken breasts and simmer for 15 minutes or so, or until cooked through. Remove them from the broth with a slotted spoon and reserve. Keep the broth for some other soup project.

While the chicken is cooking, wash, peel and grate the carrots. Shred the white part of the spring onions in thin slivers. Cut the cucumber in thin matchsticks. Toss the vegetables with the rice wine vinegar and reserve.

Next, prepare the sauce. In a double boiler, or a heavy bottomed pan over a low flame, mix all the ingredients. Once the peanut butter has melted and the sauce is smooth, taste. You may want to add a little more sesame oil or hot oil. Or if some of the recipes are to be believed, you may find a little sugar will complement the hot oil. It's up to you: I kept it relatively simple and it was delicious.

To assemble the salad, simply divide the lettuce onto four plates and top with the vegetables. Smash the chicken breasts with a mallet (some claim this is where the "bang-bang" comes from) and pull them apart into bite-sized morsels. Divide them among the plates and drizzle (or plop) sauce over each of the chicken pieces. Sprinkle with sesame seeds.


comments

Sage Advice

By Meg in Paris on Recipes - Poultry

sage.jpgOver the years, my garden has had its ups and downs. It has never come close to the glorious fruit and vegetable producing garden of Eden that I plan each spring. Either I start well and then procrastinate planting out, or I start too late. In the past seven years that I have been attempting to create an inner-city vegetable patch, this year was the first year that we didn't leave on holiday in the month of August, leaving the garden to the mercy of inattentive cat-sitters who never remember to water. On the rare years that I have managed to plant seeds on time and plant out early, the August drought has managed to kill all but the most hardy plants.

This year, I thought it was going to be different. (Of course!) I planted seeds in March and got the seedlings out on the terrace by the end of May. For once, we were taking our summer holidays in June - a month that usually has plenty of rain and isn't too hot in Paris. My plants would survive perfectly well without care for a few weeks and I would be home in the hot month of August to do the watering myself. The first part of the plan went well: June was wet and cool. Unfortunately, so was July. Oh yeah, and August too. By the time it started to dry out in September, my tomato plants were just starting to flower. The eggplant and zucchini had already given up by then. So it was another disappointing year at the Paris vegetable patch.

But there were a few plants that valiantly thrived despite the cold, wet summer: my herbs. Rosemary, sage and basil all flourised. Even the coriander, which I traditioinal am truly awful at keeping alive more than a week, survived for several weeks, died and then had a phoenix-like resurrection.

But sage was the star of the show. If you are interested in balcony gardening, I have to say that it's my biggest and best recommendation. It's very easy to raise from seed, has beautiful dusty green leaves, is delicious in so many wonderful dishes and - if you have mild winters as we tend to do - will even survive the winter. I even managed to keep one alive in a pot in the kitchen once for two years.

As a result, I use a lot of fresh sage in my cooking.

And here is another: sage, ham, turkey and wine in a somewhat authentic saltimbocca.

The "real" saltimbocca, is of course, made with veal. But as I have mentioned before, turkey works pretty well as a substitute for veal. The critic loves turkey and it certainly is cheaper than veal, not to mention more acceptable to those who are fussed about eating "baby cows". And it is absolutely delicious and so easy to prepare it's almost embarrassing. Serve it with a big helping of pasta tossed with butter, salt and Parmesan. The pasta will pick up the juices from the meat and not a delicious drop will go to waste.

Turkey Saltimbocca (serves 2-3)

2-3 turkey breast cutlets
4-6 slices of prociutto or Parma ham
4-6 fresh sage leaves (you can substitute dried, sprinkling a half a teaspoon per cutlet)
2 Tbs olive oil
2 Tbs butter
1 clove of garlic, crushed with a knife or a mallet
1 glass dry white wine

Place two sage leaves on each cutlet and wrap the cutlets with two slices of ham. Melt the butter in a large frying pan and add the butter and oil. Add the garlic and cook for a moment or two, until the clove just starts to color. Turn it over and add the cutlets. Turn up the heat slightly and cook quickly: four minutes on the first side and then two minutes after you turn them over. Remove the cutlets to a warm oven and cover them. Add the wine to the pan and cook over a high heat, scraping up any bits of meat that may have stuck to the bottom of the pan. Taste for salt and pepper; it probably won't need salt but might be improved by a pinch of pepper. If any juices have collected in the plate, add it to the sauce. Serve with a generous plate of pasta and drizzle the sauce, carefully dividing it among the cutlets.


comments

Creamy Polenta with Mushroom Ragout

By Barrett in Maryland on Recipes

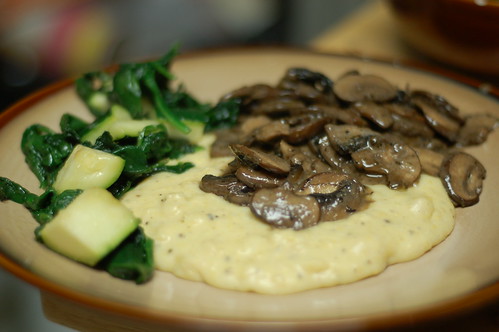
It's getting cold out there. So let's make it warm inside. Creamy polenta is a great way to warm yourself up, as are earthy mushroom in a red wine and cream sauce.

Polenta can be served many ways - and I'll be exploring some of those ways in the next few weeks - but serving it as a creamy porridgey goop is one of the most warming ways. I swiped the idea of adding cream cheese from Elise over at Simple Recipes, though I cut back on it a little since the rest of the meal is heavy.

You can make basic polenta with just corn meal and water, but adding some fat does for it what adding a little butter does for oatmeal - makes it less of a chore to eat, and more of a true pleasure.

In the picture above, the mushrooms and polenta are served with a quick sautee of garlickly spinach and zucchini. Add a little lemon to the green veggies to help cut the wonderful warmth and weight of the polenta/mushroom combination.

Creamy Polenta
1 cup corn meal
4 cups boiling water
1/2 teaspoon salt
4 tablespoons butter
1/4 cup cream cheese
1 teaspoon dried sage
salt and pepper to taste

In a saucepot, boil four cups of water. Add the salt. Once the water is boiling, using a whisk, slowly stir in the cornmeal. Don't dump the cornmeal in all at once or you'll end up with lumps you won't be able to whisk out.

Once all the corn meal is incorporated, witch to a wooden spoon and continue to stir. Stir in the butter. Cook over medium-low heat for at least fifteen minutes, stirring frequently.

Next, stir in the cream cheese. The cheese should melt into the mix. Mix in the sage.

Taste (carefully, this is sticky hot goop) and adjust salt and pepper to taste. If you don't like the look of black pepper flakes, use white pepper instead.

Musroom Ragout
4 cups sliced portobella mushrooms
4 tablespoons butter
1/4 cup red wine
1/4 cup heavy cream
1 teaspoon dried oregano
salt and pepper to taste

If you buy whole large mushroom caps (it'll take about six for this recipe), cut them into quarters before slicing about 1/3" thick.

Melt the butter in a skillet over medium-high heat. Toss in the mushrooms, oregano, and a pinch of salt to help draw out the moisture.

Toss the mushrooms frequently to coat with the melted butter. Slowly more moisture will come out of the mushrooms. If they start to burn, reduce the heat and toss more frequently.

After the musrooms start to become tender, add the cream and wine and stir into the mushrooms. Reduce heat and cook over medium-low heat for ten minutes to reduce the liquids and get a nice rich creamy sauce.

Plate a circle of polenta in the middle of a plate, spooning the mushroooms on top.

In the photo the dish is shown with a quick side sautee of spinach and zucchini with garlic.


comments

Chicken with creamy lemon and artichoke sauce

By Meg in Paris on Recipes - Poultry

lemonchook.jpgJanuary is not a very inspiring month for cooking. The choice of seasonal vegetables is slim and very starchy. You've used up all your best festive ideas over the holidays. And the stress and excitement of Christmas and the new year means your defences are down and you catch the mother of all colds. I have to say that this dish was an antidote to all of the above. The lemon gives you vitamin C and revives your taste buds with a fresh zing. The chicken and garlic give you strength to face a cold January day. And the cream, well, is comforting and indulgent, as it always is. And the best part, for me, is that it was a tiny chink in the artichoke-resistant armor of the Critic. He thinks he doesn't like artichokes, but I am slowly starting to change his mind.

One of the ways I overcome the dearth of good vegetables in the winter is to turn to the freezer section of the store. In the summer, I stick to fresh and seasonal vegetables but in the middle of the winter, I am a bit more relaxed. And when I do buy them, I like to favor the ones that are, frankly, too much of a pain to prepare under normal circumstances. For this reason, artichoke hearts and fava beans are frequently to be found in my freezer.

Another advantage to using frozen artichoke hearts, of course, is that this is very quick and easy to prepare! I served it over rice because the Critic also has a quinoa aversion. However, next time I think I'll prepare a little of each as I am a complete fan and think it would look beautiful over a mound of red quinoa grains!

Chicken with a creamy lemon and artichoke sauce (serves 2)

2 boned chicken breasts
2 cloves garlic
juice from 1/2 a lemon
1/2 cup (110 ml) cream
a splash of wine
6 frozen artichoke hearts
1 tsp fresh or frozen basil
2 Tbs butter
2 Tbs olive oil

Melt the butter in a large heavy bottomed frying pan with the oil. Finely chop the garlic and add it to the butter and oil. Cut the chicken in bite-sized pieces and add them to the pan. Brown them on all sides. Add the wine and lemon juice and deglaze the bottom of the pan, scraping up any bits of garlic or chicken that have stuck to the bottom. Slice the artichoke hearts and add them to the pan. Add the cream and simmer for 15-20 minutes, or until the chicken is cooked through and the artichoke pieces are tender. Stir in the basil and taste for salt. Serve over grains or pasta, as your fancy takes you!


comments

Roasted Cauliflower and Cumin Quiche

By Meg in Paris on Recipes - Vegetables

cauliquiche.jpgI have never asked my mother, but I suspect she is not a fan of cauliflower. I don't remember eating it much when I was growing up and so came to love it rather late in life. It's a homely vegetable and I can see why many people don't like it. As with all members of the cabbage family, it leaves a lingering smell that isn't really all that appetising, especially once dinner is over. It's easy to over-cook and when you do it turns into a smelly, mushy unattractive mess. But when it's treated well and given a little spicy lift, it can be truly delicious: filling and full of flavour and wonderful comfort food. This dish brings out the best in the humble cauliflower and I'm going to be making it again. I might even try it on the Critic (who thinks he doesn't like cauliflower).

I have been making a lot of extra vegetables lately, as the baby now has solid food - mostly vegetarian - twice a day. For this recipe, I roasted a whole cauliflower and used half in the quiche and half as baby food. Roasting the cauliflower makes it easier not to overcook it and also adds a nice depth to the flavour.

The cumin in this recipe works beautifully to pull together cauliflower, cheese and egg into a lovely coherent whole. I can't decide if I liked it better hot from the oven or cold the next day for lunch; either way you won't be disappointed!

Roasted Cauliflower and Cumin Quiche

1/2 a head of cauliflower
1 Tbs cumin seeds
2 Tbs olive oil
5 eggs plus one white
1/3 cup / 75 ml cream
2/3 cup / 150 ml milk
1/2 tsp salt
60 g (about a half cup) grated sharp cheddar cheese

1 pie crust (Note that this recipe, which I used, calls for one egg yolk, thus explaining the extra white in the filling. If you are using your own recipe or a pre-rolled crust, you can use another whole egg instead of a single white.)

Preheat the oven to 180c/350F. Wash the cauliflower and shake it dry. Cut off the rough bottom of the stem so that it sits flatly on a surface. Drizzle a little olive oil in a baking pan, place the head in the pan and drizzle a little more oil over it. Bake for 40 minutes or until tender. If the head looks like it is browning too quickly or drying out (mine did at about the 30 minute point) you can add a few tablespoons of water to the pan and cover with tin foil.

In the meantime, make the pie crust and put the dough in the refrigerator.

About fifteen minutes before the cauliflower is done, remove the dough from the refrigerator. Grind the cumin and salt with a mortar and pestle. Mix the eggs, cream and milk and whisk well. Stir in the cumin and salt.

Roll out the pie crust and place in a pie tin. Blind bake the crust in the still hot oven for ten minutes. While it is baking, remove the cauliflower (if done) and let it cool on the counter. Grate the cheese.

To assemble the quiche, spread the cheese on the bottom of the pie crust. Slice the cauliflower in thick (3/4", 2 cm) pieces, keeping them together as much as possible so they look more decorative. Spread over the cheese and cover with the egg mixture. Bake in the hot oven for 30-35 minutes, or until golden brown on top and set. Let cool for 5-10 minutes before serving.


comments

Chocolate Yogurt Cake

By Meg in Paris on Recipes - Breads and Cakes

boycupcake.jpg

Fans of Clotilde at Chocolate and Zucchini are already very family with the concept of the yogurt cake. She has posted a few variations on this French classic recipe. So I hesitated about adding my own version to the many existing ones. In the end, I was motivated by three things:

1. My recipe is slightly different and, well, very, very chocolate. That's got to be worth something to our readers.

2. Although she mentions that this recipe is particularly good for introducing children to cake baking, she does not actually have a cute kid who can demonstrate this fact. Big brother is an enthusiastic cook already, though most of his "help" so far has been limited to grating cheese (which he promptly eats) and stirring the bowl occasionally. He had a lot of fun with this recipe and I took a lot of photos.

3. The Critic is in Singapore for two weeks and needs to see photos of the boys he's missing. So I can keep him informed on what we are doing at the same time.

Obviously, I needed to post the recipe and photos. Read on for my take on the most child-friendly recipe on the planet. It really is a lovely, flexible cake: light and yet not too crumbly, perfect for little fingers to pull apart and eat without leaving a carpet of crumbs on the floor. I'm going to be making it again in just over a month for Little Brother's first birthday!

Chocolate Yogurt Cake (Makes one layer cake in an 8" pan, though I used some of the batter for cupcakes as you can see in the photos)

The reason this recipe is so child friendly - aside from the fact that it is after all a cake and chocolate to boot - is that nearly all the measurements are made using the yogurt pot once you have emptied it of yogurt. Little hands that have played in the sandbox at the park are very good at filling cups and dumping them; it's a concept they understand completely. (By the way, do have them wash those sandy little hands before you begin, right?)

1 pot of natural yoghurt (125 ml)
1 yogurt pot of vegetable oil
2 yogurt pots of sugar
3 yogurt pots of flour
3 eggs
200 grams of semi-sweet chocolate (I used two bars of Nestle's Noir Extra Fondant)
4 tsp baking powder (in France, use 1 sachet of levure chimique which can be found in the baking section of any French grocery store)
1 tsp vanilla extract

1) Assemble ingredients and wash your hands. Make sure the counters are (for once) clean.

bigbroready.jpg

2) Park Little Brother in a safe place with some plastic clips for playing. Have unsweetened Cheerios on hand for when the clips are no longer interesting enough.

littlebrother.jpg

3) Break up the chocolate and place in a double boiler over a medium flame to melt it. (Photo is of Big Brother licking the spatula after it has been used to add the chocolate to the batter.)

boychoc.jpg

4) Preheat the oven to 180C/350F.

5) Spoon the yogurt into a large bowl.

boyyogurt.jpg

6) Add the oil, eggs, vanilla and sugar and begin mixing.

boymix.jpg

7) Add the flour and baking powder and mix well. Stir in the by now melted chocolate.

8) Pour the batter into lined cupcake tins (fill 2/3 of the cup) or into a greased and floured cake pan.

9) For cupcakes, bake 15-20 minutes, until a toothpick inserted in the center comes out clean. For cake, bake for 15 minutes at 180C, then reduce to 150 and bake a further 20-25 minutes. Again, check for done-ness by inserting a clean toothpick.

10) While Mom or other kitchen slave puts away ingredients and cleans the counter, continue sampling the batter on various kitchen implements.

boychoc2.jpg

boychoc3.jpg

11) Cool cupcakes or cake on a rack and consume with enthusiasm once cooled. (See first photo for the latter.)

cupcakes.jpg


comments

Cranberry and Quinoa Salad with Coriander and Chili Dusted Chicken

By Meg in Paris on Recipes - Salads

quinoasalad2.jpgLast Thursday I received an email from my friend Ami about picnics. I was coming to the end of a long chicken-pox infected week on my own with the boys, so I jumped at the idea. Friday or Saturday?? Count me in for both! Big brother was past the contagious stage and the weather in Paris had suddenly blossomed into luxurious summery sunshine. I was ready to venture out and have me some adult conversation.

However, as I was on my own with the two boys and under a deadline, I really needed to find the ingredients for a tasty lunch in my kitchen. I knew I had a couple of chicken breasts and a bit of cucumber for the fresh elements. I started searching through the cabinets for the rest of the ingredients. A big box of red quinoa jumped out at me: I'd been meaning to experiment with it for some time but the Critic is no fan of nubbly food. That set me on a kind of a New World strain and so I pulled out the plump sweetened dried cranberries I picked up at Target on our recent trip to the US. As luck would have it, I had a couple of bunches of young shallot shoots in the back of the vegetable bin, which would also liven the mixture a bit. Cumin was my first choice for a spice, but I love it so much lately that I'm frequently out. Coriander was my second choice and it worked so well that I'm glad I had no cumin in the spice drawer.

The resulting salad was delightful: full of flavors that zing and interesting textures. It is the perfect picnic food in that it's relatively quick and easy to prepare and best served either slightly cooled or at room temperature. I loved it so much that I made it again three days later when we were invited to visit friends in the country for lunch in their garden. And even the Critic liked it. I'll be making it again. I'd like to say that I'll be using it as a template for other interesting ventures, but I'd be lying. It really was quite perfect just the way it came out the first (and second) time(s).

Cranberry and Quinoa Salad with Coriander and Chili Dusted Chicken
(serves 4-6 as a side dish in a picnic spread)

2 boneless free range chicken breasts
175 grams red quinoa (regular quinoa can be substituted)
450 ml water or broth (I used Better than Bouillon Mushroom Base)
3/4 cup dried cranberries (you could substitute plump sultanas or giant raisins)
4 green onions or shallot shoots, finely sliced in rounds
1 cup chopped cucumber
small handful of parsley leaves, roughly chopped
1/2 tsp ground coriander
1/4 tsp chili pepper
1/4 tsp salt
1/4 tsp pepper
4 tbs olive oil, divided

For the sauce: 1 container plain yogurt, 1/4 tsp salt, 1/4 tsp pepper, 1/4 tsp ground coriander, 1 tsp fresh or frozen chopped coriander, 1 tbs lime juice.

Put half the olive oil in a deep heavy bottomed sauce pan over a medium heat. Add the quinoa and stir for a few minutes, until a few grains make popping noises and a nutty aroma develops. Pour in the water or broth and cook at a low boil for 25 minutes or until the seeds are chewy and have sprouted little curlicues.

In the meantime, prepare the chicken. Pour the remaining olive oil over the chicken breasts and slather over both sides. Dust both sides of the breasts with the dried spices and place on a hot grill. Grill for 5-7 minutes on one side with the grill top on, then flip the breasts and continue cooking another 3-5 minutes. The breasts should be cooked through (no pink in the center) but not dried out. Allow them to cool while you prepare the rest of the salad ingredients.

Allow the quinoa to cool a bit before folding in the salad components: the chicken (cut into bite-sized pieces), the cranberries or raisins, the finely sliced shallots or green onions, the parsley and the cucumber. Mix the dressing ingredients together well in a small bowl and serve alongside the salad.

Serving the dressing drizzled over the salad made a prettier plate (though I forgot to take a photo of it) and also made the salad more interesting, as it meant an intense sour note from time to time to counteract the sweet fruity taste of the cranberries and the spiciness of the pepper and coriander.


comments

0 Comments:

Post a Comment

<< Home